Bezel setting can be one of the simplest forms of stone setting to get the hang of. Therefore, it's the ideal place to start for those relatively new to jewellery making.
We’ve gone all-out on bezel setting at the Metalsmith Academy with full classes on its various forms; from simple bezels for round cabochons to setting princess cuts with perfectly crisp corners. We may be a little bit crazy for bezels, but the good news is whether you’re brand new to this stone setting malarkey, or you’ve made bezel settings galore, we’re here to guide you.
In this post, I want to share a couple of my favourite tips from our classes for setting cabochons and rose cuts of all shapes and sizes. Let’s dig right in…..
Bezel wire - sterling or fine?
Thankfully, you can purchase ready made bezel wire in a variety of metals and gauges, which saves so much time faffing around making your own. When just starting out, I recommend going for 28 gauge FINE silver bezel wire as it’s quite a bit easier to move over the stone than bezel wire made from sterling silver. Having said that, 28 gauge is pretty easy to move either way.

Slight tangent: If you are just starting out with bezels, I suggest starting out with round stones first, followed by ovals and sugar loafs (with soft corners). Once you’ve got those nailed, it’s time to tackle corners – they can be tricky little buggers, but we’ll get to those later.

If you can't find the perfect bezel wire, use sheet metal
If you can’t find the perfect size bezel wire for stone, or if you just don’t have $$$ to place yet another order (because you forgot to get it two days ago with the last one), have no fear. It’s just a strip of metal. You can take sheet of fine or sterling silver already in your stash, and simply scribe a line to the height you need your bezel and get sawing. Or if you’re lucky enough to have a guillotine, that will make a super quick job of it!
If you have a rolling mill.....
Another option for creating your own bezel wire, which is a little easier than cutting strip, is to simply roll a heavy gauge wire through the flat rollers of your rolling mill. In the image to the right, I took 10-gauge sterling silver wire, and rolled it lengthways to 0.9mm thick.
The finished wire will have slightly rounded edges which I’ll usually sand down after the bezel is formed (just remember to leave a little extra height to account for this).

Bezel height
This is all about getting to know your stone. Bezel height is not determined by how tall your stone is – weird I know. What’s important is the height at which, when looking at the stone from the side, the stone starts to curve. The bezel needs to be just slightly higher than this point in order to securely set the stone.

If we make the bezel too tall, we’d end up with a jagged and rough looking bezel. There’s more to it than that, so for more info on bezel height, check out our other blog post below.

Too tall

Too short

Just right
When checking the bezel height, we aren’t looking at the outside of the bezel, but the inside. We want to see just a tiny amount of metal above where the stone starts to curve over. And we want to see a small gap between the stone and the bezel.
What gauge bezel wire should I use?
There’s no denying it’s easier to set thinner gauge bezels. However, how thick you choose is entirely up to you. The thickest bezel I ever set was using 1.3mm sterling silver sheet (that was a brutal job to set).
For smaller stones, 28 gauge (0.33mm) wire can work perfectly, but for chunkier monkeys you might want a sturdier looking bezel, and so you may choose to go with 22 gauge (0.64mm) or 18 gauge (1.02mm).
Generally speaking, the heavier the bezels will need to be set using different tools / techniques than those used for setting thinner bezels. Let’s take a look at a few examples:

28 gauge (0.33mm)

22 gauge (0.64mm)

18 gauge (1.02mm)
Preparing heavy gauge bezels
I am particular about my bezels. I love to see a bright metal chamfer around the inside of my bezels – if you look at any high-end settings out there, you will notice this little detail. For this reason, I never file my bezels to a knife edge at the top, but rather, leave a small flat spot that will form that bright rim once the stone is set.

Chamfer with a flat spot

Chamfer with a knife edge
If you like these gorgeous lapis doublets: Click here to grab them now.
Sand the top of your bezel to 1000 grit
Whether setting a heavy weight or a thinner bezel, take the time to ensure the top of the bezel is sanded perfectly flat to 1000 grit before setting the stone. Taking the time to focus on the details now will help ensure everything looks crisp and professional once set.

Setting thicker bezels
Without a knife edge on thicker settings, it will require quite a bit more effort to set the stone. That being the case, I’ll use a hammer and punch or a hammer handpiece to set heavier bezels. It is possible in some cases to use a rocker to set with, but because of the pressure required, the risk of slipping and smashing the crap out of your hand as you do so is REAL!
When using a punch, be sure to always keep the face of the punch aligned to the bezel chamfer – do not let it lean from side to side. In reality this means constantly increasing the angle of your punch / hammer handpiece as the bezel moves further and further over the stone.
You’ll also want to make sure you use sandpaper or rubber wheels to take off any hard edges on the face of your setting punch / anvil to make sure you aren’t gouging the hell out of your bezel as you set it.
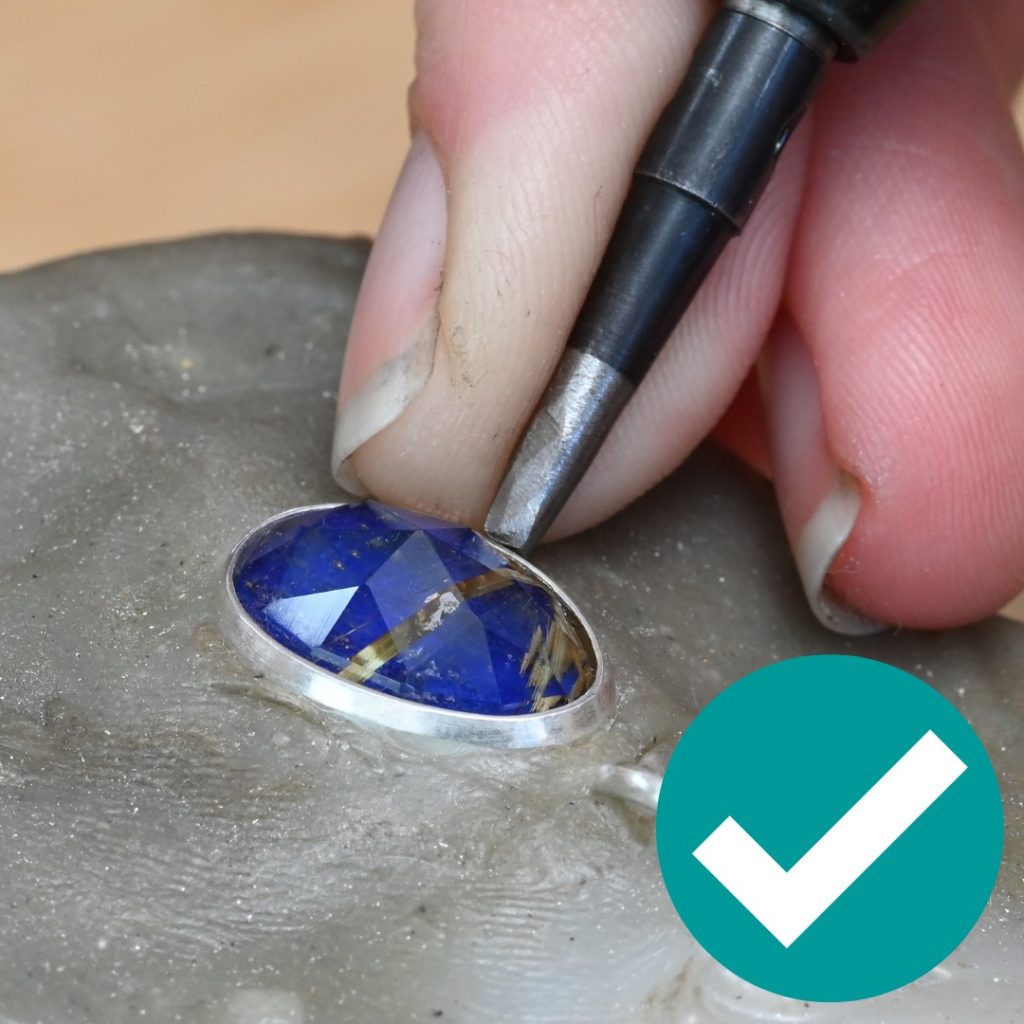
Make sure the setting punch (or anvil) is flat on to the side of the bezel
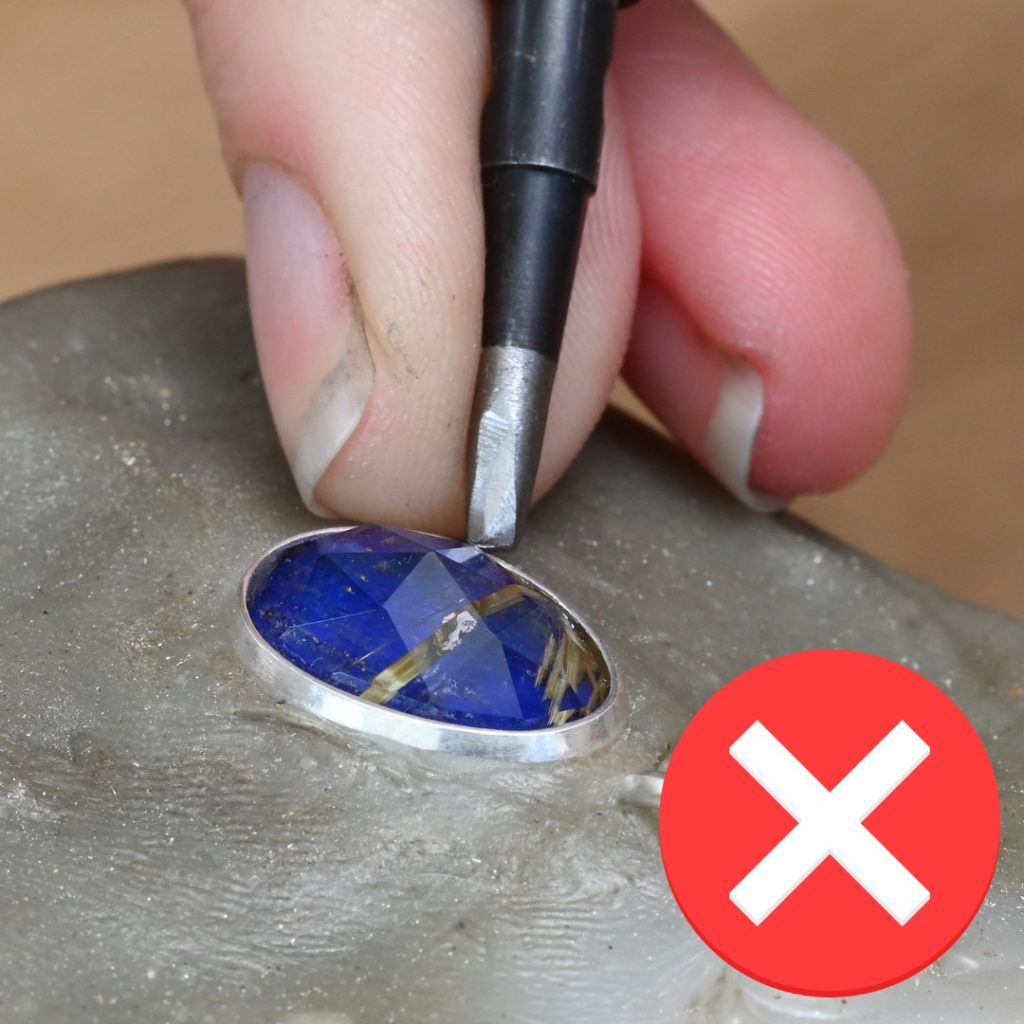
The setting punch (or anvil) should never be allowed to tilt sideways

Setting thinner bezels
When using thinner bezel wire such as 28 gauge (0.33mm), setting the stone is a relatively simple procedure. Because the metal is already exceptionally thin, there is no need to cut a chamfer around the edge of the setting, and the bezel can be pushed over the stone using a bezel rocker or a burnisher.
Bezel setting stones with corners
There is just one simple rule when it comes to corners: set them first. Because there is so much metal converging at the corners, this is going to undoubtedly be the hardest part to set. But we also have to remember that the more we work our metal – even with thinner bezel wire – the harder the metal becomes. And so, if we leave our already difficult corners to the last for setting, we are going to have an exceptionally hard time getting the metal down and over the stone.

When it comes to the corners, this is what we’re aiming for: the bezel is down and in contact with the stone completely at the corners.
It takes a little practice to get the hang of, but just by starting setting directly on the corners, and then working away from the corners as you move the bezel over the stone, you’ll find it easy in no time.

Corners should never look like this, I’m afraid. The gap at the corner will be a huge junk yard for sweat, dirt and random cosmetics to congregate in. Even if you’re going for an organic style bezel – which I personally love – getting those corners down and in contact with the stone shows that you did it as a design feature, rather than because you simply don’t know how to deal with corners.
Cutting through the corners is an age-old trick that I’m on the fence about. I have never found it necessary, but I can imagine with super thick bezels or exceptionally hard metal such as rose gold, that you may just have to do it. So if you do this, make sure to use a very thin blade and burnish the metal thoroughly after setting to ensure you can’t see that cut.
Like the stones? Click here to grab yours now
How to finish up your bezel settings safely and professionally
When it comes to finishing up bezels made from thinner gauge metal, this should be relatively easy. When pushing over the bezel, as long as you worked gently and evenly around the bezel, there really should be very few marks to remove after setting.
In most cases they’ll simply need a light touch with a pumice wheel, followed by a final polish. It’s important here to stick with a pumice wheel, and not to use any other rubber wheel which may scratch your stone if you catch it (not that you should be ramming the wheel over your stone inconsiderately). Pumice is a 6 on the Mohs scale of hardness, so that means it shouldn’t scratch stones that are harder than a 6 on the same scale. Rubber wheels made for general metal work are made from an abrasive that is usually around 9 on the Mohs scale, so if you catch your stones with these (especially the coarser wheels) you are likely to put faint scratches on your stone.
TOP TIP: Never ever ever use sandpaper to clean up your bezels.
YOU WILL SCRATCH THE SHIT OUT OF YOUR STONE

Using a pumice wheel to clean up your bezel
When it comes to cleaning up bezels, I like to use a medium grit flat wheel. I buy the ready mounted ones from Otto Frei for convenience (I’ve popped a link below). The key with these is to keep the edge of the wheels perfectly flat, don’t overuse them, and use a light feathering motion to trace the entire bezel around the stone. We’re not running them indiscriminately over everything here, we’re working mindfully and following the chamfer on our bezel. These do work quite quickly, so be careful not to thin out the bezel too much.
One final point on pumice wheels: Remember, it’s very easy to modify the shape if necessary with a diamond plate, an old file, or a 240 grit sandpaper stick. The wheel above started out as a flat edge – but as you can see, it needed to be modified to reach the bezel where the jump rings are attached.
Use the code: LWAY5 at checkout for a 5% discount for orders $100 or more
Finishing up thicker bezels
Because we’re using a hammer handpiece or a hammer and punch when setting thicker bezels, it’s quite likely there are a few more dings in the bezel that will require cleaning up. That’s not to say your bezel should look like it got chewed by a bulldog – learning to control your punch and how to modify it to keep marks to a minimum are super important too. Heavier bezels will often require a little file work before moving onto a pumice wheel, and for that I’ll generally use a #2 – #4 cut barrette needle file with a safety edge to protect my stone.
The bezel pictured was set using a hammer handpiece (before clean up), as you can see there are no major dings.

You can grab these stunning stones RIGHT HERE

Burnish or bright cut the inside edge of the bezel
Use a needle burnisher, parallel sided burnisher, or a graver if you can. To give your bezels a finishing touch that’ll really make them pop, create a brightly polished rim around the stone. This is a little more difficult to do with thinner bezels, but it really does give a simple setting a professional looking finish.
I hope you found these tips and tricks helpful. As with everything, if you work mindfully, and with purpose, you’ll have those bezel settings nailed in no time. If you would like to see all these tips and tricks in action, we’d love to welcome you to the Metalsmith Academy, where we have bezel setting classes galore, all filmed in beautiful close up detail with crystal clear explanations!
Ready to dive in and create your own professional looking bezel settings?

Join the Metalsmith Academy today and you’ll have access to over 6 individual classes on different bezel and tube setting variations. Not only will you get access to bezel setting videos, but tonnes more classes too – all filmed with your viewing pleasure in mind. According to our students, our videography is the best out there!
You’ll also be able to ask questions on this class and others in our active community forums where Lucy and Vennice are personally available every single day.