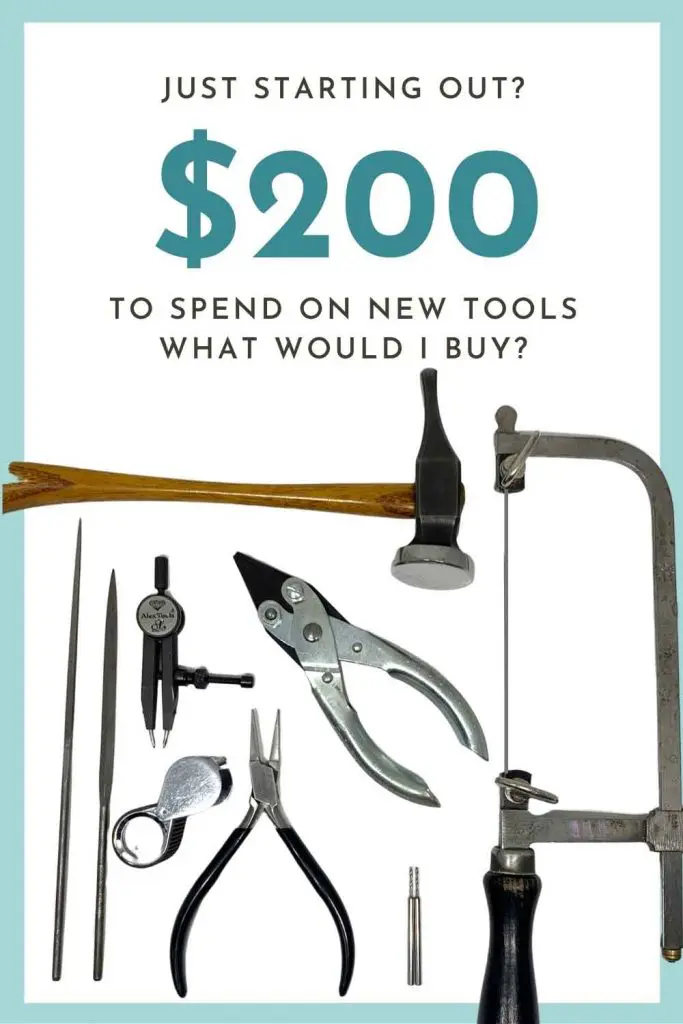
A question I get asked all the time: How much does it cost to get started making jewelry?
Well, this is a big question, and there is no firm answer here. It really does depend on what you’re going to make. But I came up with a plan to help you get started less than $500 – although full disclosure, this plan involves you borrowing a rotary tool! More on why I’m insisting on borrowing, not buying, later on!
Of course, there’s also the metals you’ll need to get started making jewellery, but I’m not going to cover the materials portion of this question here, as this blog post is getting a little too long already. I will cover the ideal tools to get started, and show you that with a little ingenuity and DIY-ing, you really can get started for less than $500.
If you want to cut to the chase, you can find (almost) all the products mentioned in this post right here:
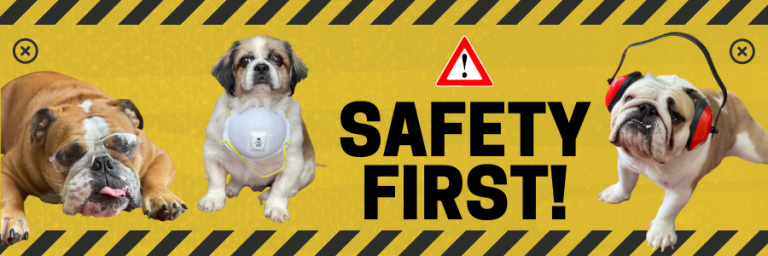
Safety glasses, mask, ear protection and a fire extinguisher.
These are absolutely the first tools you should have before you even pick up a hammer!
For more information on health and safety in the studio,
I can’t recommend The Jewelry Workshop Safety Report by Charles Lewton Brain enough.
Let's dive in and take a look at the tools you need to start making jewelry.

The very first thing you’re going to need is a place to work. A sturdy work surface in a well-ventilated area.
For health and safety reasons, you’ll want to set this up somewhere away from where you’ll be eating and away from children and pets!
When selecting a work surface, we’re looking for something relatively heavy duty that doesn’t wobble and preferably something a little on the taller side for maximum working comfort.
If you don’t have anything that fits the bill, I’d suggest checking out Facebook marketplace or any secondhand sellers you can find. Whatever it is you’re going to work on will get dinged up over time, so I’m just saying, don’t go ruining your lovely new dining table when you can pick something up off craigslist for $20!
The piccy above is of a traditional jewellers workbench. You really don’t need anything quite this fancy to start with, but hopefully it gives you an idea of the ideal height.
Alrighty, but what about the actual jewelers tools you need to start metalsmithing? I'd better get on with them.....
I realized I’ve waffled enough, so I’m getting direct to the list here. But if you do want to read a little more, and understand what these tools are used for – keep scrolling down!
$16
$20
$20
$20
$13
$65
$11
$17
$6
$5
$25
Total spent - $400
I left an extra $100 for the next part!
Drills for Making Jewelry
Yeah.... I missed the drill out of the main list, because I wanna talk about that in a little detail.
So, what kind of drill should you buy for making jewellery?
This is a bit of a weird one, because I don’t want you to buy one of these, they’re not really ideal for jewellery making but it will work to begin with before investing in a flex shaft motor (I’ll talk about these later).
So, if you can find a friend who would be willing to lend you a drill of some sort, such as a dremel or even a hand drill, that would be awesome. But like I said, I don’t recommend buying one of these.

If you really can’t find a drill to borrow for a while, and you must buy a Dremel, I don’t recommend going for any of the cheaper models such as a “Dremel Lite” or a Dremel Stylo. I have bought these and tested them out just for you, and they do not have enough power to drill through metal.
Something such as a Dremel 3000 will drill through metal, and if used with the flex shaft attachment, it does work. The cost of a Dremel is about $60 and the flex shaft attachment is $35. I don’t believe that as standard the Dremel comes with a chuck to fit most jewelry tools, so you will need to buy one of those separately too which costs about $12.
Whatever you do if you do buy a Dremel though, is do not get distracted with all the fancy accessories that they might come with, you’re probably not going to use very many of these at all. They are certainly not worth paying extra for.
After all that, I’ll tell you the main issue I have with Dremels, and that is that they have an on off switch. They do not allow you to control the speed or start and stop the motor with a foot pedal. This means your drill is running before you start drilling and so I find that getting started drilling and hitting the right spot is a lot more difficult.

In an ideal world, but only when you have figured out that you really want to get into this jewelry making malarkey for real, you’ll want to buy a flex shaft. And you’ll want to buy a good one.
My personal favorite is the model I’ve linked to from Universal Motors, which comes with a quick-change handpiece as standard. Despite having some very expensive micro-motors at my disposal, this is my go-to machine for almost everything rotary.
When you do buy a flex shaft, you’ll need to purchase a flex shaft hanger too.
When we dive into more details on each of the tools I’ve recommended, which I’ll do below, you’ll see I’m all for saving money where you can. But, a flex shaft is not where you should be trying to save money, you will only end up replacing a cheaper model later on. I’ve had and used cheaper models, and whilst they are in my opinion still a better option than a Dremel, I have found that the speed control goes very quickly and it’s almost impossible to run these at slower speeds after 6 months or so.
Another excellent choice for a quality flex shaft would be the Foredom SR. The SR can be ordered with a quick-change handpiece – for ease of use, or a standard chuck style #30 handpiece which can be used with a variety of drill bit sizes.
My personal choice would always be a quick-change handpiece, and this is what I use 99% of the time.
$339
$316

Jewelers Drill bits - 1mm
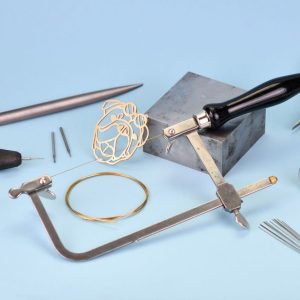
Surely with just these tools I'll be stuck with simple jewelry making projects?
Of course you’ll be able to get started making simple jewelry projects with these tools. And I really recommend starting simple, but focusing on doing it well when you’re just starting out.
All the projects to the right were made using just these tools. But that’s not to say that’s all you can do with these basic jewelry making tools.


The pieces in the piccy to the left are all possible with just the few jewelry making tools mentioned in this article – (plus a few handmade setting punches).
It really isn’t about the size of the tool collection, it’s what you do with them that counts! A little ingenuity is a lot more valuable than a huge tool collection.
I’m not going to deny it though, you are probably (just like the rest of us) going to end up a tool whore. It is what it is, I love tools!! But when just starting out, not only isn’t it possible to have all the tools, but it’s actually a benefit. By not having access to everything, we’re forced to learn to use and truly master what we have.
But I want all the tools now goddamnit…
I hear you loud and clear!! So, here’s what I’d suggest. If you want to become a fully-fledged tool whore:
Start by making simple but quality pieces, using just the basic tools, and then focus your attention on selling those. And there are a number of reasons to work this way:
1. Learning to sell your work is just as important, if not more so than learning to make it.
2. Making simple quality pieces that sell and building those skills slowly will mean you spend less time making practice projects, and more time making work that sells.
3. Making pieces that sell means that you can BUY MORE TOOLS!
Bench Tools for Jewelers
The absolute basics you'll need to get started making jewelry

Safety Glasses
Before using any rotary tools, you’ll most definitely want to get a pair of safety glasses. As jeweler’s tools go, our eyes are by far the most valuable!
Ideally, you should wear these all the time in the studio. However, at a bare minimum they MUST be worn when using rotary tools, polishing motors, or bench grinders. You aren’t daft, I know that, so if you feel there is any risk at all, my advice is to wear them.
In terms of health and safety, I also highly recommend getting an N95 face mask too.

Bench Pin and Anvil
Most of the work we do as a jeweler isn’t done on our bench, it’s actually done on our bench pin. From sawing, to filing, to drilling, you’ll do most of this on a bench pin.
These are available in a variety of styles, but my recommendation when just starting out would be to go for a clip-on version that includes a steel surface to use as a bench block. You get two tools this way for the price of one!
Jeweler's Saw Frame
Saw frames come in a huge variety of styles, but they’re all based on the same concept – they simply need to hold your saw blade tightly. If you’re just starting out making jewelry, I’d suggest going for a simple saw German style frame.
In my opinion, there is no point in spending $100 or more on a frame that doesn’t make sawing any easier. I have almost every jewelers saw frame out there and 100% of the time, I choose to use my $9 German style frame.
The standard German style frame comes in a variety of depths (the measurement from the back of the saw frame to the blade) to suit larger and smaller jobs. To start out with, for small scale jewelry work, I recommend going for a depth of around 2.5 inches to 4 inches in depth, but if you’re intending to do larger scale work such as cuffs, you’ll need something a little deeper. The smaller saw frames are easier to control than the deeper ones, which is why I don’t use a deep saw frame for most of my work.


Quality Saw Blades - 2/0 and 4/0 in size
Whilst I’m all in favor of cheap saw frames, there is little I detest more than cheap saw blades. They don’t cut straight, they break regularly, and there is a chance they will lead to personal mental deterioration.
Super Pike & Nano amongst others are my personal preference.
Anything costing $5 for 100 or more blades is most likely going to be a bloody nightmare to use.

Lubrication

Steel Ring Mandrel
If you want to make rings, then one of these is a must. They’re generally used for sizing and forming rings, but can be used for a variety of other things too, such as creating curved forms in sheet metal.
You may also want to buy a ring sizing set in order to measure your customer’s finger if you intend to make custom rings.
SUPER IMPORTANT: Make sure you’re buying a steel mandrel (aluminium mandrels are used for checking the size only of rings only).
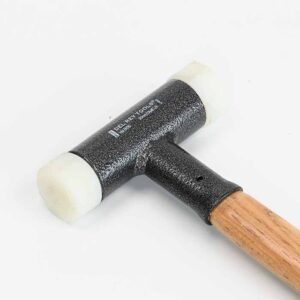
Nylon Dead Blow Mallet
Everyone says to buy a rawhide or rubber mallet when just starting out, but in my opinion a dead blow mallet is worth the extra cost.
The head of the mallet contains steel shot which means it can really pack much more of a punch than a rawhide or rubber mallet.
You can get these in a variety of different weights, and the heavier the hammer the more expensive they tend to get. I’ve linked to a 16oz version which is what I use most often.
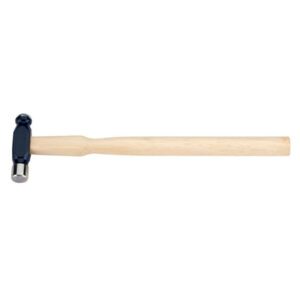
Ball-Peen Hammer
A ball peen hammer is a super handy piece of kit to have when just starting out. They’re a fast and easy way to add texture to your work as well as being useful for forming.
Just be careful to take care of the faces of the hammer if you do intend it to use for texturing. If you make any marks on your hammer through careless use, they will transfer to the metal you’re applying a hammer textured finish to.

Chasing Hammer
Chasing hammers are used regularly in the studio for forming work. But they’re actually designed for chasing (or tapping the end of steel punches – as when bezel setting).
If you do use your chasing hammer as it’s intended (for striking tools) I’d avoid using this again for forming metal. The repeated action of striking the end of steel tools will leave dings in most commercial hammer faces.
Files for Jewelers - These can get pricey!
Jeweler files are not cheap, but they are good! I’d say the best advice with files is to start with just a few and then add to the collection as necessary. Don’t be tempted by the cheap hardware shop files, they’re made from softer steel and will dull very quickly!

Barrette Needle File - Swiss cut #2
An absolute must for a jeweler’s toolbox, the barrette needle file is one tool you’ll find yourself using almost every day. From refining saw piercing work, to filing the edges of bezels or rings, you’ll always need one of these on hand.
A Swiss cut #2 which is somewhere in the middle when it comes to coarseness (#0 is coarser, #4 is finer), will work perfectly for most jobs to start out with.

Half-Round Needle File - Swiss cut #2
Another needle file that’s a must is the half round. Again, I’d go for this in a #2 cut.
But why do we need two different shaped needle files? Well basically for filing surfaces that are flat, you’ll want to use the barrette file mentioned above which has a flat filing surface. But for filing concave surfaces, such as the inside of ring bands, you’ll want to use a file with a curved surface.
If you can only afford one needle file to start with – I’d suggest the half round file as it does have a flat surface too. The reason I prefer not to use this for filing flat surfaces is because it’s not able to reach the tight spaces that a barrette is able to reach without the half round portion of the file catching opposing surfaces.

$48.50
Half-Round Hand File - Swiss cut #2
A half round hand file comes with both a curved and flat surface again just like the needle file above. The difference in these files is just the size. Having a larger hand file makes larger jobs a lot easier and faster. If you can afford a flat hand file too, I’d suggest buying one of those in a Swiss #0 cut, however you can get by with just a half round hand file to start with.
After the three files mentioned above, the next file I’d be buying would be a flat hand file in a #0 cut, followed by a round, square and triangle needle file in a #2 or #3 cut.
FYI: without getting into all the details, a #2 Swiss cut file generally leaves a finer finish than a #2 German cut file.
The close up shows a #2 cut German file on the left vs a #2 cut Swiss file on the right.

Pliers for Jewellers - you don't need to go broke!
I love cheap pliers! Don’t get me wrong, I’m also a raving fan of Tronex, but when you consider that one pair of those will likely cost you as much as 10 pairs of budget pliers, well it kind of makes you rave just a little bit less.
I 100% recommend buying budget pliers to start out with. They might not be quite as comfortable to use as Tronex, but they more than get the job done. I’ll also add that out of all my pliers, the ones that get the most use are my modified budget pliers by far. So just as with fancy saw frames, my advice would be to skip the fancy pliers for now.

Flat-Nose Pliers
With two flat, wide jaws, flat nose pliers are one pair of pliers that you’ll use pretty much every day as a jeweler. They’re great for basic forming work, holding small pieces for filing, and of course for opening and closing jump rings.
I have a couple of pairs of these personally. One is unmodified, and the others have the edges rounded out and softened to various degrees so as not to mark my work as I use them.

Chain-Nose Pliers
These are pretty much the same as the pliers above, and used for roughly the same kind of tasks. The difference being rather than having wide parallel jaws, the jaws on these taper to a narrow tip which just makes them able to reach into tighter spots.
Again, I have a couple of pairs, one that is unmodified for crisp bends, and a couple of others that have been modified as needed.
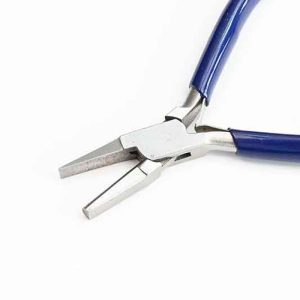
Flat/Half-Round Pliers
Every beginner jewelry making video out there will tell you to get a pair of half round pliers. I 100% disagree with this.
Get a pair of half round AND FLAT pliers. One jaw is half round, and one jaw is flat. The benefit of these over having pliers with two half round jaws is that these don’t leave nearly as many marks on your work. I don’t remember the last time I used a pair of purely half round pliers.

Flat/Round Pliers

Xuron® Flush Cutter
Whilst I love cheap pliers, cheap flush cutters quite simply don’t work. The brand I have linked to is the best value decent quality cutters I’ve found.
These are also known as snips, and I only ever use the flush cut variety – they leave a much smoother finish on one side of the cut than regular snips / cutters.
Always check what gauge wire your snips are rated for. The bigger the snips, the heavier the gauge wire they can generally cut, but if you try to cut through 10-gauge wire with these, you’re likely to break them.
Soldering Tools for Jewelers
The absolute bare basics - always make sure to have a fire extinguisher handy!

Blazer Micro Torch
A great way to start soldering confidently is to use a simple butane torch. These torches are used regularly in kitchens around the world and so are often referred to as creme brulee torches.
This particular torch is a smaller version, useful for soldering rings, jump rings and small pendants.
If you’re intending to make larger pieces you may want to look at the Pepe Tools Tsumani torch or the Durston Standard Blow torch. There is however a limit to the size of work you can create with a butane torch.

Compressed Charcoal Block
Compressed (or hard) charcoal is an excellent choice for a soldering surface when just starting out. Unlike soft charcoal, this won’t crack / crumble / burn itself to hell during use.
The blocks are available in a variety of sizes, but personally I prefer the small ones. If necessary, I can use two at once.
PAY ATTENTION! These should not be used directly on your work bench, unless you want to set it on fire. Not only are they too small to avoid accidentally hitting your surroundings with the flame, but they also get very hot during use. Place these on a fire brick or floor tile for use. For an extra layer of safety, have all that sitting inside a low lipped baking tray on your bench just incase anything you’re working on rolls off whilst hot.

Handy® Flux
My favorite flux! This is perfect for working in silver, brass, bronze or copper. It’s super durable and lasts really well under longer soldering operations where a liquid flux might burn off.
If you’ve had trouble soldering brass, bronze and copper before, I recommend giving this flux a try.
TOP TIP: If your flux starts to dry out, just add a little water.
Crock Pot and Citric Acid for Pickling
Citric acid makes for a great pickle, it’s cheap and easy to use. I use a ratio of about 1 cup of acid to 5 or 6 cups of water. Remember to always add acid to water just like your chemistry teacher told you! You’ll also want a pair of copper tweezers for placing items in the pickle.
To keep it warm, I use a slow cooker. Pickle works best hot (not boiling hot ok – just like a nice hot bath). Pickle vapors aren’t healthy so don’t let it boil. I’d recommend having one with an automatic off switch, so if you forget about it (it happens), it will automatically turn itself off. The one I use most regularly also has a warm and a hot setting – the warm setting works perfectly to leave on all day without boiling.
$18.99 / Each

Titanium Solder Pick
I love my titanium solder pick. It speeds up soldering no end for me in comparison with using tweezers. It takes a little bit of practice to get used to, but once you do, you’ll wonder how you ever lived without it.
To pick up the solder, make sure you have a little flux on the pick, place the pick about an inch behind your solder and have the tip of your flame about one inch in front of the pick. Heat the solder until it turns into a ball, REMOVE THE HEAT, and scoop up the solder. Easy! But always remember to remove the heat before scooping.

Cross-Locking Straight Insulated Tweezers
When it comes to holding work for soldering, it doesn’t get much simpler than cross locking tweezers. Bonus points for the fact that they’re cheap as chips. I rarely use third hands for soldering. When I can’t lay something directly on my charcoal block for soldering, these are almost always my go-to!
These cross-locking tweezers have handles which are insulated to protect your fingers from the heat generated while soldering. You can purchase these with bent tips or straight tips – both are handy to have, but I use my straight tipped tweezers most often.
Fire Bricks
These are great for protecting work surfaces whilst soldering. Just place one or two underneath your charcoal block.
Not only are these great for fire protection, but they can also be used to create structures to aid heat retention when melting metal. Super handy to have, I just wish we could get hold of them easily here in Malaysia! Hence, there is no picture!
$22.52 / Pkg. of 6
Basic Finishing / Polishing Tools for Making Jewelry
Polishing can get crazy, but it's easy as long as you finish everything to 1,000 grit first.

ZAM® - 1/4 lb
My favorite all round, one stop polishing compound. If you want a bright and shiny finish on your work, you’re going to need this.
TOP TIP: Make sure to bring your work up to 1,000 grit sandpaper with no visible scratches before polishing. If there are scratches on your work when you start polishing, there will just be shiny scratches when you finish!
Wear a mask when polishing!

Mounted Cotton Buff
Bog standard and simple, these are my go-to buffs for a huge variety of small polishing operations.
These are used together with the polishing compound above and work perfectly for a variety of surfaces including the inside of ring bands.
Don’t forget to wear a mask while using these, you really don’t want to be breathing in either polishing compound or the tiny cotton fibers from the buff.

Sandpaper
The perfect finish does not come from polishing, it comes from the surface preparation that comes before polishing.
Sandpaper can be used in sheet form, but it can also be used to make sandpaper sticks and sandpaper rolls to make a variety of jobs a lot easier. It’s something a jeweller can’t live without, but thankfully it’s the simplest and cheapest abrasive out there.
You can find almost all the tools mentioned in this blog post right here:
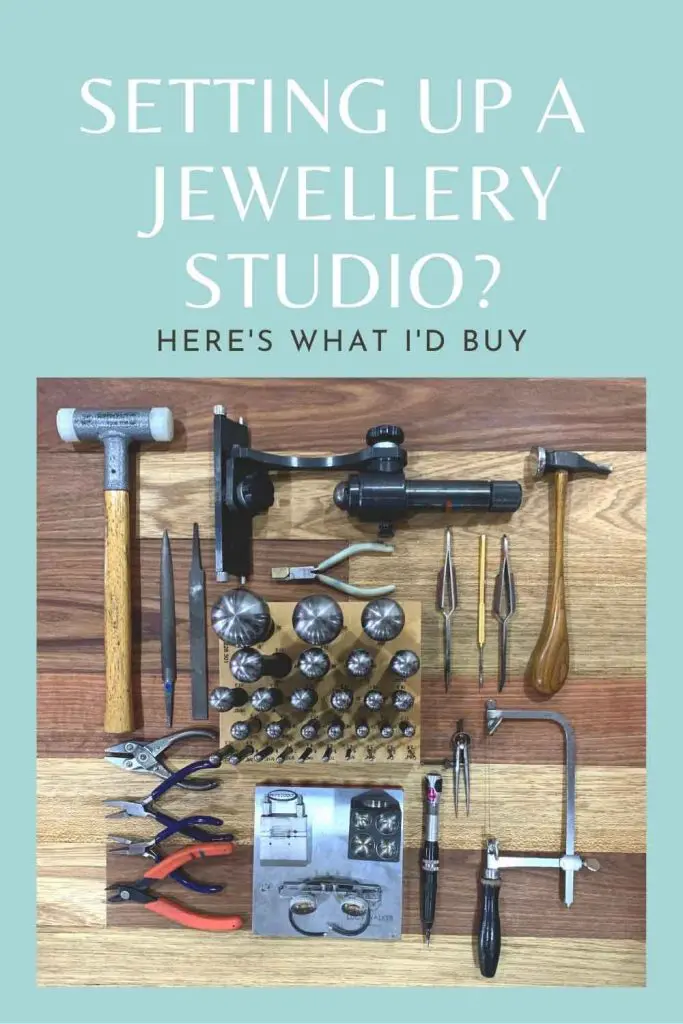
Other Tools You'll Want
Once you've started making money with the basics, a couple of super important things you'll want to add to your collection pretty soon are:
Dividers – I recommend the brand Starrett which are quite pricey at around $90 a pair. However, cheaper dividers will work, and a pair of $6 dividers is way better than no dividers at all.
Calipers – just as with dividers, it’s worth saving for a pair of quality calipers. My favorite brand is Mitutoyo, but at around $180 a pair they are very expensive. If you can borrow a pair for a while great, if not, you can buy digital calipers for under $30 from Home Depot that will do the job for a while (just keep the receipt – as the cheap ones seem to die quite quickly).
Flex shaft – I mentioned this already, but just wanted to put it here too.
Engineer’s Square – These are super simple but extremely handy tools for checking alignment. Thankfully, they’re also cheap as chips and available at most hardware stores.
- Focus on learning marketing as much as you focus on learning to make jewellery.
- Take it slowly and focus on producing simple but high quality pieces to begin with – and then sell them. Don’t get distracted by every new tool, gemstone or technique that tickles your fancy.
Ready to dive in and create your own professional looking jewellery?

Join the Metalsmith Academy today and you’ll have access to all the classes you need to get up and running making professional looking jewellery with confidence – all filmed with your viewing pleasure in mind. According to our students, our videography is the best out there!
You’ll also be able to ask questions on this class and others in our active community forums where Lucy and Vennice are personally available every single day.
Curious about what’s happening at the Metalsmith Academy, but not quite ready to join? Sign up below to take a peek the classes available, resources, and all the magic we have to offer! As a welcome gift, we’ve prepared some incredibly helpful free resources that you won’t want to miss.