If you want to get started with flush setting, you're definitely going to want to make one of these. Needle burnishers are by far the best burnisher for flush setting!
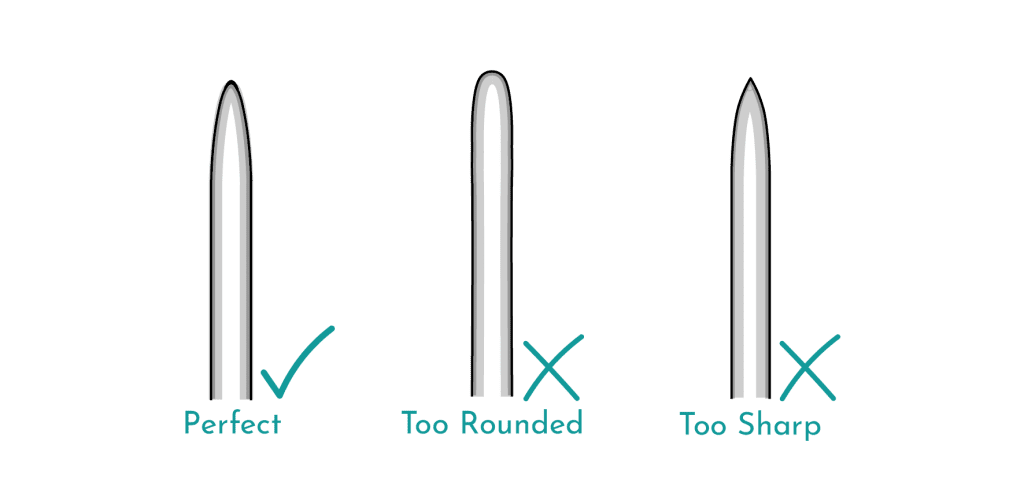
For a needle burnisher to do its job correctly, the shape very important. It should be a rounded bullet shape. It shouldn’t be a round blob, nor an aggressive stabbing implement, but a graceful balance between the two. Unfortunately you can’t buy these ready made. But, fortunately they’re exceptionally easy to make yourself in a few easy steps following along with the video above.

Needle Burnisher Size
You’ll want to have needle burnishers in different sizes for different sized stones. The smaller the stone, the smaller the tip of your burnisher will be.
It will take a little trial and error to find that perfect size, but using the right sized burnisher will mean a lot less slippage when setting – so it is absolutely worth taking the time to make several and experiment with them all.
You’ll also want to make these from both tool steel for harder stones, and stainless steel for softer stones. You can of course use the stainless steel version on hard stones too, I just find I get a better finish, and work faster with my harder, tool steel needle burnisher. An excellent option for tool steel is to use broken burs. For stainless steel, you can use a crochet needle or large sewing needle…… basically go steal stuff from your nan, you’ll usually find you can cut through these quite easily with a jewellers saw
Create the perfect shape for your burnisher
You’ll want to do this with 100 grit sandpaper. Using a sandpaper stick is perfect for this (we show you how to make these here).
You’ll want to pop your old broken bur (or crochet needle) into the flex shaft for this, and simply set the flex shaft running at a medium speed as you run it against your 100 grit sandpaper. As well as moving your flex shaft back and forth along the sandpaper stick, you’ll also want to lift it up and down to get that perfect bullet shaped tip to your needle burnisher – the correct shape is imperative!
Bring your burnisher up to a bright polished finish
This is the simple part. All we need to do repeat the process used to shape the needle burnisher with finer and finer sandpaper. I’ll generally use 240 grit, followed by 600, 800 and 1200 grit. For a final polish, which we really want if we want a bright shiny finish to our setting, just charge a little leather with polishing compound, and then repeat as if it were just another sandpaper stick.
Add a handle and jobs a good one
I love to use a tool handle with a chuck for my burnishing tools as it’s super easy to take the burnisher out again and give it a quick polish from time to time.
And that really is all there is to it! If you have any questions at all, just pop them in the comments below.
Lucy x
Want to learn more?
We would love to welcome you to the Metalsmith Academy where we can help you create the jewellery you always dreamed of.
- Incredible classes with close up videos and crystal clear explanations
- Extensive full colour handouts for all our classes (a firm favorite with our current members)
- Quick win projects, we call them Express Bites. If you don’t have the time to commit to a full class, but want to learn some new skills quickly, these are for you
- Bi-monthly challenges to help get those creative juices flowing
- Active community forums – and when we say active, seriously it’s like a party over there!
- Direct help – Lucy and Vennice are over in the forums every single day to help
- Exclusive discounts
- Tips and tricks galore – you got a problem, we create the content you need to fix it
Just click below to join the family now!